Ubuntu MATE で複数の Emacs ディストリビューションを動かす
2023-09-06
2389 words
5 mins read
- 1 目的
- 2 今回の目標のイメージ
- 3 環境
- 4 Ubuntu MATE への Emacs のインストール
- 5 Chemacs を使って複数の Emacs をたちあげる
- 5.1 今回使用するディレクトリ
- 5.2 chemacs のインストール
- 5.3 Spacemacs のインストール
- 5.3.1
~/EmacsDistディレクトリの作成 - 5.3.2 Spacemacs のレポジトリのクローン
- 5.3.3
~/.spacemacs.dディレクトリの作成
- 5.3.1
- 5.4 Doom Emacs のインストール
- 5.4.1 Doom Emacs のレポジトリをクローン
- 5.4.2
doom installの実行 - 5.4.3 、=doom sync= の実行
- 5.5 chemacs の設定
- 5.5.1
~/.emacs-profiles.el - 5.5.2
~/.emacs-profile
- 5.5.1
- 5.6 chemacs の使いかた
- 6 結論
1 目的
Ubuntu MATE 23.04 に Emacs をインストールする方法を説明します。
また、chemacs2 を使って複数の Emacs を同時に動かせるようにします。
以下のツールを使います。
2 今回の目標のイメージ
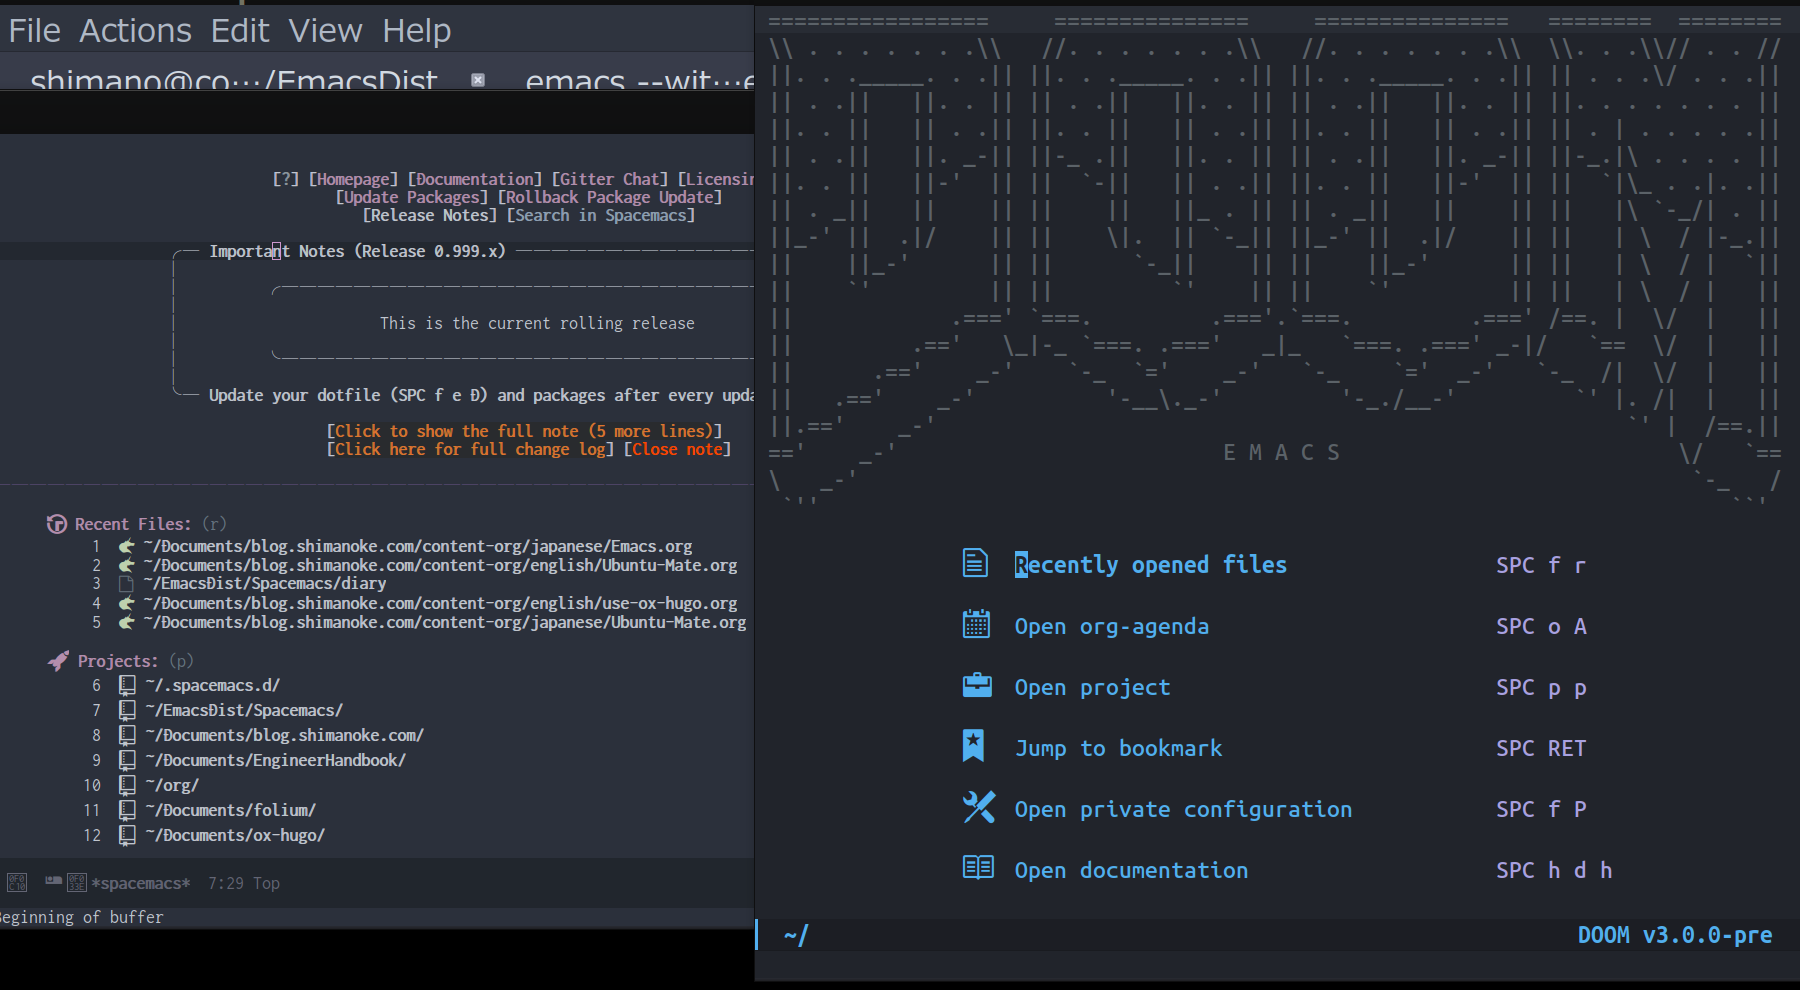
今回の設定を行なうと下図のように Spacemacs と Doom Emacs を同時に動かすことができます。

図1: Spacemacs と Doom Emacs を同時に動かす
3 環境
今回 Emacs をインストールする環境です。
- Guest OS
- Ubuntu MATE 23.04
- Host OS
- Windowd 11 Professional
VM 環境: VirtualBox 7.0.100
4 Ubuntu MATE への Emacs のインストール
Ubuntu MATE へ Emacs のインストールするには次のようにします。
sudo apt -y install emacs emacs-gtk
Emacs のバージョンを確認します:
emacs --version
GNU Emacs 28.2
Copyright (C) 2022 Free Software Foundation, Inc.
GNU Emacs comes with ABSOLUTELY NO WARRANTY.
You may redistribute copies of GNU Emacs
under the terms of the GNU General Public License.
For more information about these matters, see the file named COPYING.
以上で Emacs 自体のインストールは終了です。
5 Chemacs を使って複数の Emacs をたちあげる
複数の Emacs の異なるディストリビューション、 異なるバージョンを動かしたいことがあります。 そのために私は chemacs2 を使っていあます。
今回は次の 2 つの Emacs のディストリビューションを 動かします。
chemacs2 の詳細は以下をごらんください。
5.1 今回使用するディレクトリ
今回使うディレクトリの説明です。 「chemacs の設定」で重要になります。
~/.emacs.d- chemacs 用のファイルがはいります
~/EmacsDist- 複数の Emacs のディレクトリを置くディレクトリ
~/EmacsDist/Spacemacs- Spqcemacs のディレクトリ
~/EmacsDist/DoomEmacs- Doom Emacs のディレクトリ
~/.spacemacs.d- Spacemacs 用の設定がはいるディレクトリ
=~/.doom.d- Doom Emacs 用の設定がはいるディレクトリ
5.2 chemacs のインストール
chemacs2 をインストールします。 ターミナルンから次を順番に実行してください
# .emacs ファイルの退避
[ -f ~/.emacs ] && mv ~/.emacs ~/.emacs.bak
# .emacs.d ディレクトリの退避
[ -d ~/.emacs.d ] && mv ~/.emacs.d ~/.emacs.default
# Chemacs のインストール
git clone https://github.com/plexus/chemacs2.git ~/.emacs.d
既存の Emacs 設定があった場合には、次のように退避されます:
- ~.emacs/ → ~.emacs.bak/
- ~.emacs.d/ → ~.emacs.defaulta/
以上で chemacs のインストールは終了です。
5.3 Spacemacs のインストール
今回使用するディレクトリは次のとおりです。
~/EmacsDist/Spacemacs- Spqcemacs のディレクトリ
~/EmacsDist/DoomEmacs- Doom Emacs のディレクトリ
5.3.1 ~/EmacsDist ディレクトリの作成
各種 Emacs のディストリビューションを格納するディレクトリを作成します
mkdir ~/EmacsDist
5.3.2 Spacemacs のレポジトリのクローン
Spacemacs のレポジトリをクローンします。
cd ~/EmacsDist
git clone https://github.com/syl20bnr/spacemacs ~/EmacsDist/Spacemacs
“develop” ブランチをチェックアウトします 必要ないかもしれません。
cd Spacemacs
git checkout develop
5.3.3 ~/.spacemacs.d ディレクトリの作成
Spacemacs の設定ファイルを格納する
~/.spacemacs.d ディレクトリを作成します。
mkdir ~/.spacemacs.d
~/.spacemacs.d ディレクトリの作成
以上で Spacemacs のインストールは終了です。
5.4 Doom Emacs のインストール
doom Emacs をインストールします。 使用されるディレクトリです。
~/.spacemacs.d- Spacemacs 用の設定がはいるディレクトリ
=~/.doom.d- Doom Emacs 用の設定がはいるディレクトリ
~/.spacemacs.d- Spacemacs 用の設定がはいるディレクトリ
=~/.doom.d- Doom Emacs 用の設定がはいるディレクトリ (doom instal で自動的に作成されます)
5.4.1 Doom Emacs のレポジトリをクローン
Doom Emacs のレポジトリをクローンします: すぐに終わります。
cd ~/EmacsDist
git clone --depth 1 https://github.com/doomemacs/doomemacs ~/EmacsDist/DoomEmacs
5.4.2 doom install の実行
次に Doom Emacs をインストールします。 結構時間がかかります。 途中で質問がでるので “y” と入力します。
~/.doom.d という、設定ファイルを格納するフォルダが作成されます。
~/EmacsDist/DoomEmacs/bin/doom install
Installing Doom Emacs!

✓ Created ~/.doom.d/
  - Creating ~/.doom.d/init.el
  ✓ Done!
  - Creating ~/.doom.d/config.el
  ✓ Done!
  - Creating ~/.doom.d/packages.el
  ✓ Done!
Generate an envvar file? (see `doom help env` for details) (y or n) y
# y と入力します

> Generating envvars file
  ✓ Generated ~/EmacsDist/DoomEmacs/.local/env
Installing plugins
> Installing straight...
...省略

Download and install all-the-icon's fonts? (y or n) Please answer y or n.  Download and install all-the-icon's fonts? (y or n) Please answer y or n.  Download and install all-the-icon's fonts? (y or n) y
# y と入力します
✓  Finished! Doom is ready to go!

But before you doom yourself, here are some things you should know:

1. Don't forget to run 'doom sync', then restart Emacs, after modifying init.el
   or packages.el in ~/.config/doom.

   This command ensures needed packages are installed, orphaned packages are
   removed, and your autoloads/cache files are up to date. When in doubt, run
   'doom sync'!

2. If something goes wrong, run `doom doctor`. It diagnoses common issues with
   your environment and setup, and may offer clues about what is wrong.

3. Use 'doom upgrade' to update Doom. Doing it any other way will require
   additional steps. Run 'doom help upgrade' to understand those extra steps.

4. Access Doom's documentation from within Emacs via 'SPC h d h' or 'C-h d h'
   (or 'M-x doom/help')

Have fun!

✓ Finished in 9m 48s
5.4.3 、=doom sync= の実行
上の出力に書いてあるとおり、=doom sync= を実行します。
~/EmacsDist/DoomEmacs/bin/doom sync
> Synchronizing "default" profile...
  > Regenerating envvars file
    ✓ Generated ~/EmacsDist/DoomEmacs/.local/env
  > Installing packages...
    - No packages need to be installed
  > (Re)building packages...
    - No packages need rebuilding
  > Purging orphaned packages (for the emperor)...
    - Skipping builds
    - Skipping elpa packages
    - Skipping repos
    - Skipping regrafting
    - Skipping native bytecode
  > (Re)building profile in /home/shimano/EmacsDist/DoomEmacs/.local/etc/@/...
    > Deleting old init files...
    > Generating 4 init files...
    > Byte-compiling ~/EmacsDist/DoomEmacs/.local/etc/@init.28.el...
    ✓ Built init.28.elc
  - Restart Emacs or use 'M-x doom/reload' for changes to take effect
以上で Doom Emacs のインストールが終了しました。
5.5 chemacs の設定
5.5.1 ~/.emacs-profiles.el
~/.emacs-profiles.el を作成し、
次のように入力します。
(("spacemacs" . ((user-emacs-directory . "~/EmacsDist/Spacemacs")
                 (env . (("SPACEMACSDIR" . "~/.spacemacs.d")))))

 ("doom" . ((user-emacs-directory . "~/EmacsDist/DoomEmacs")
            (env . (("DOOMDIR" . "~/.doom.d"))))))
以下パラメータの説明です。
- spacemacs
- user-emacs-directory :
~/EmacsDist/Spacemacsは Spacemacs のレポジトリを クローンしたディレクトリです - SPACEMACSDIR:
~/.spacemacs.dは Spacemacs の設定ファイルがあるディレクトリです。
- user-emacs-directory :
ー doom
- user-emacs-directory
"~/EmacsDist/DoomEmacsは Doom Emacs のレポジトリを クローンしたディレクトリでう。- DOOMDIR:
~/.doom.dは Doom Emacs の設定ファイルがあるディレクトリです
- DOOMDIR:
5.5.2 ~/.emacs-profile
~/.emacs-profile を作成し、次のように入力します。
spacemacs
~/.emacs-profile
“spacemacs” は ~/.emacs-profiles.el の中で指定した
エントリーの名前です。ここで指定したものが “emacs” 単体で
起動したときに使用されます。
以上で chemacs の設定は終了です。
5.6 chemacs の使いかた
Spacemacs を起動するには次のようにします.
emacs --with-profile spacemacs
# または
emacs
Doom Emacs を立ち上げるには次のようにします。
emacs --with-profile doom
6 結論
今回は chemacs2 を使って、 Ubuntu 上で Spacemacs と Doom Emaccs を動かす 方法を紹介しました。
Spacemacs の使いかた/設定については別の機械に紹介します。
Related Articles:
- 2023/08/31 Emacs Tips
